COURSE – Manual Mode Photography
In this course I to take what can seem like the complicated task of learning to shoot your DSLR in manual mode and broken it down into easy steps and have done my best to interpret the sometimes confusing camera language into plain English.
This is a great course for anyone who is interested in learning to shoot their DSLR in manual mode, I’ve had many mom’s, aspiring (and actual) photographers and many bloggers take this course over the years.
Manual mode is so vital because it lets you take the photos you actually want instead of the pictures your camera thinks you want.
I became a photographer a number of years ago after my own wedding pictures were a complete let down and even though I quickly became busy shooting weddings and families it still took me a long time to get my head around the camera jargon and took lots of trial and error before I could fully shoot in manual mode. I created this course for others out there who were like me and have gotten frustrated when learning manual mode in the past.
Thank you for joining this course! I am so excited for you to begin the journey of shooting in manual mode. I hope that this will improve your photos greatly and give you images that you will treasure for years to come.
I learned how to shoot in manual years ago with a lot of trial and error, while there is nothing wrong with trial and error I am hoping this course will help things to click a lot faster for you than they did for me.
Be sure to have your camera with you as you go through the modules so you can work on changing your settings as we go. Also, since every camera is slightly different in the way that it operates you may find it useful to have your camera’s manual with you as well.
A LITTLE BACKGROUND ON MY ENTRANCE INTO PHOTOGRAPHY
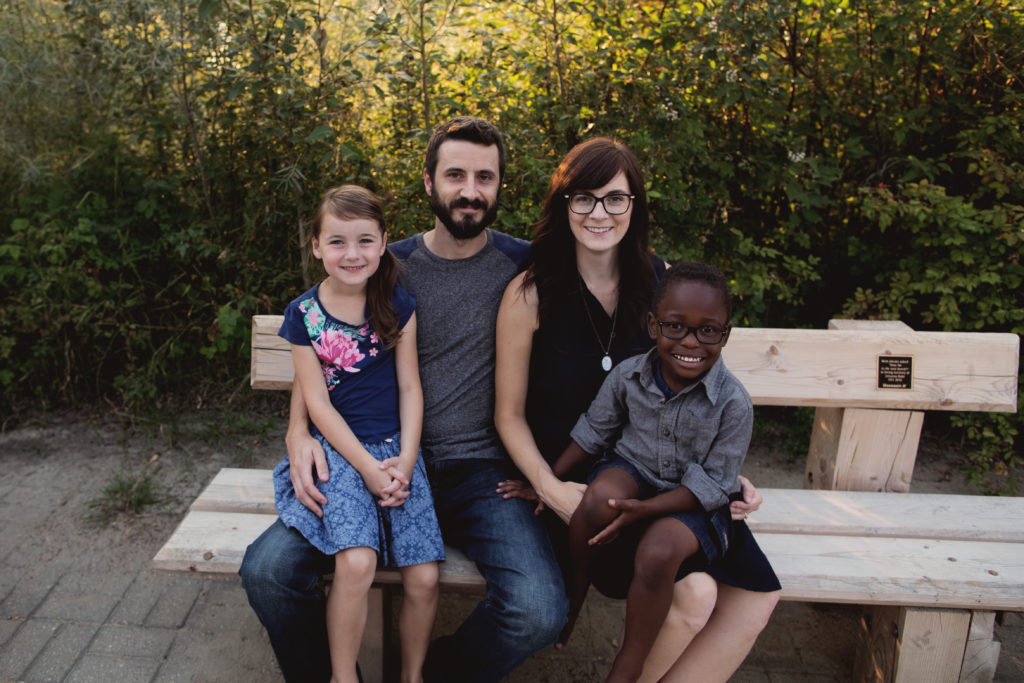
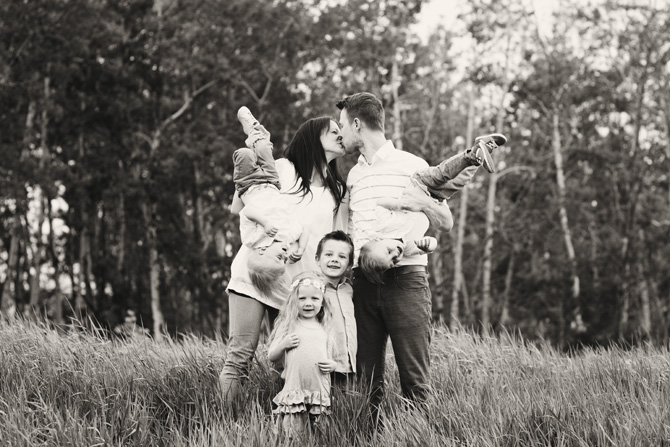
Hi, I’m Chantel! And that there above is me with my favorite people, my family.
I started my photography business back in 2007, after receiving my wedding photos back and being disappointed. I thought, I can do better than that! It was also a way to bring in some extra money while I was in university studying to become a teacher. Shortly before finishing my degree I realized that I really loved to combine my love for photography and teaching, resulting in this very workshop.
I have already taught this course in-person a number of times, and love that I can teach it to you online!
TIME TO SWITCH TO MANUAL MODE
Sorry the video cut off the last few seconds! I was just going to tell you that if you are struggling to figure out how to set your focus points you should check in your manual first. If that doesn’t work, try Googling “setting focus points” or “AF point” along with the type of camera that you have.
Throughout the modules there are sections labelled Take a Minute, this is an opportunity for you to try what you have just learned. Don’t expect your photo to look perfect after the first one or two steps, all the steps I am going to teach you work together to get the perfect image. Even though you may not get the perfect image right away I suggest actually taking a minute and trying the new technique out, the best way to learn is by doing.
It is time to take that big step –go ahead and switch your camera to manual mode {usually expressed as M on your dial}. Once you have it set there, promise me you won’t go back to auto or any of the other modes.
I mean it, I need you to promise me. It takes some work to get used to shooting in manual mode but trust me, once you get the hang of it it will become second nature, and it won’t take as long as you initially think either.
If your camera has live (video) view you can switch it over to live view and instead of taking a photo to see how bright/dark your image is you can see your changes instantly in live view.
FOCUS POINTS
One of the first steps we are going to take is to learn how to set your focus points. Your camera is automatically set to decide where it wants to focus {the default place it focuses on is usually whatever is closest to it}; we are going to change that so you have full control and can focus on what you want.
In the video I explain how to change the focus points on most cameras, but if you are unable to find it on yours you can look in the table of contents, in most manuals it should say something about setting the AF point {or area}. The default usually has all the points highlighted, what you want to be able to do is to select one point at a time.
When looking through your viewfinder your AF points will look something like this {you may have more or less dots, depending on your camera}.
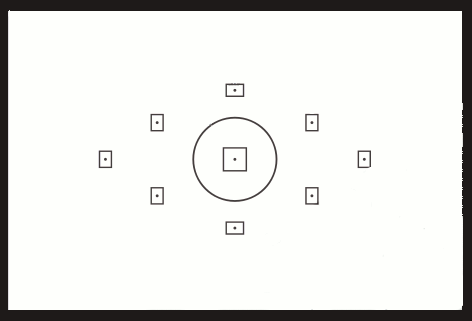
When all the points are lit up then the camera will decide for you what point it wants to use, when you select one yourself you decide that is where you want to focus.
TAKE A MINUTE
Now, since your camera is in manual mode and you can pick your focus points take a minute to take a photograph with something close to you in focus and then something far away in focus.
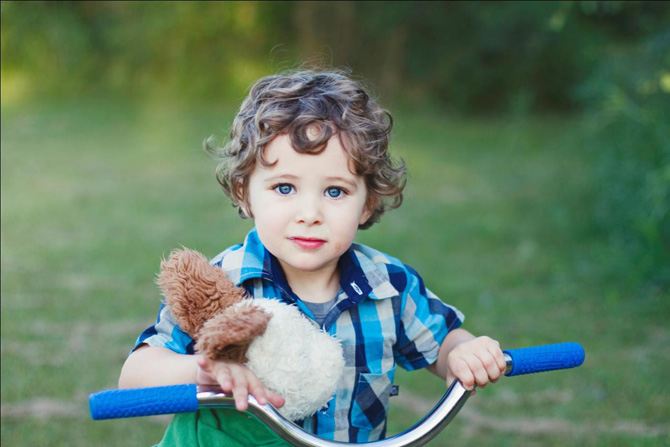
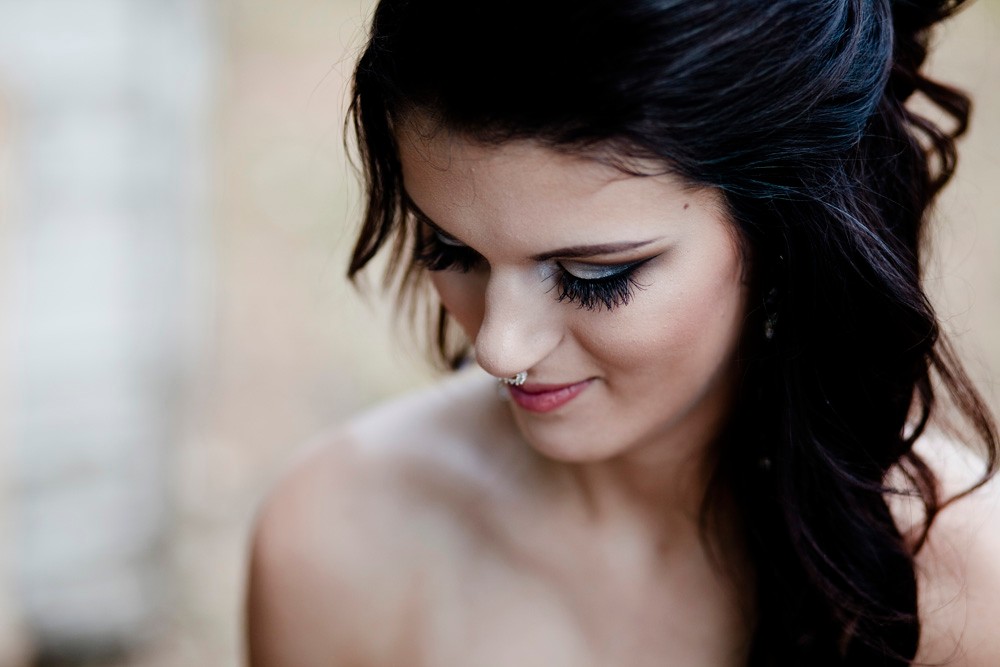
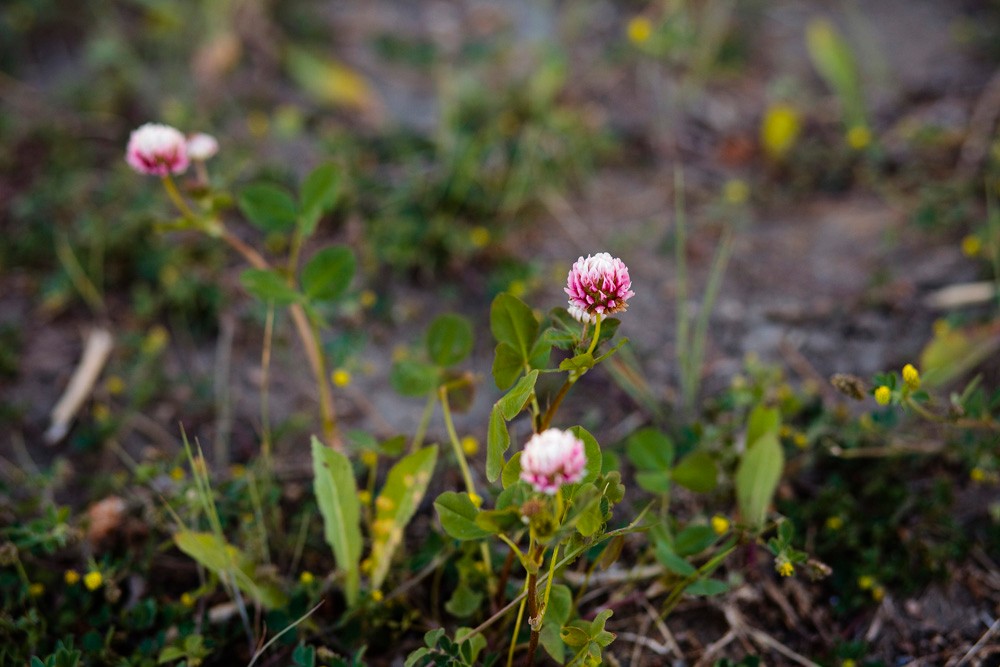
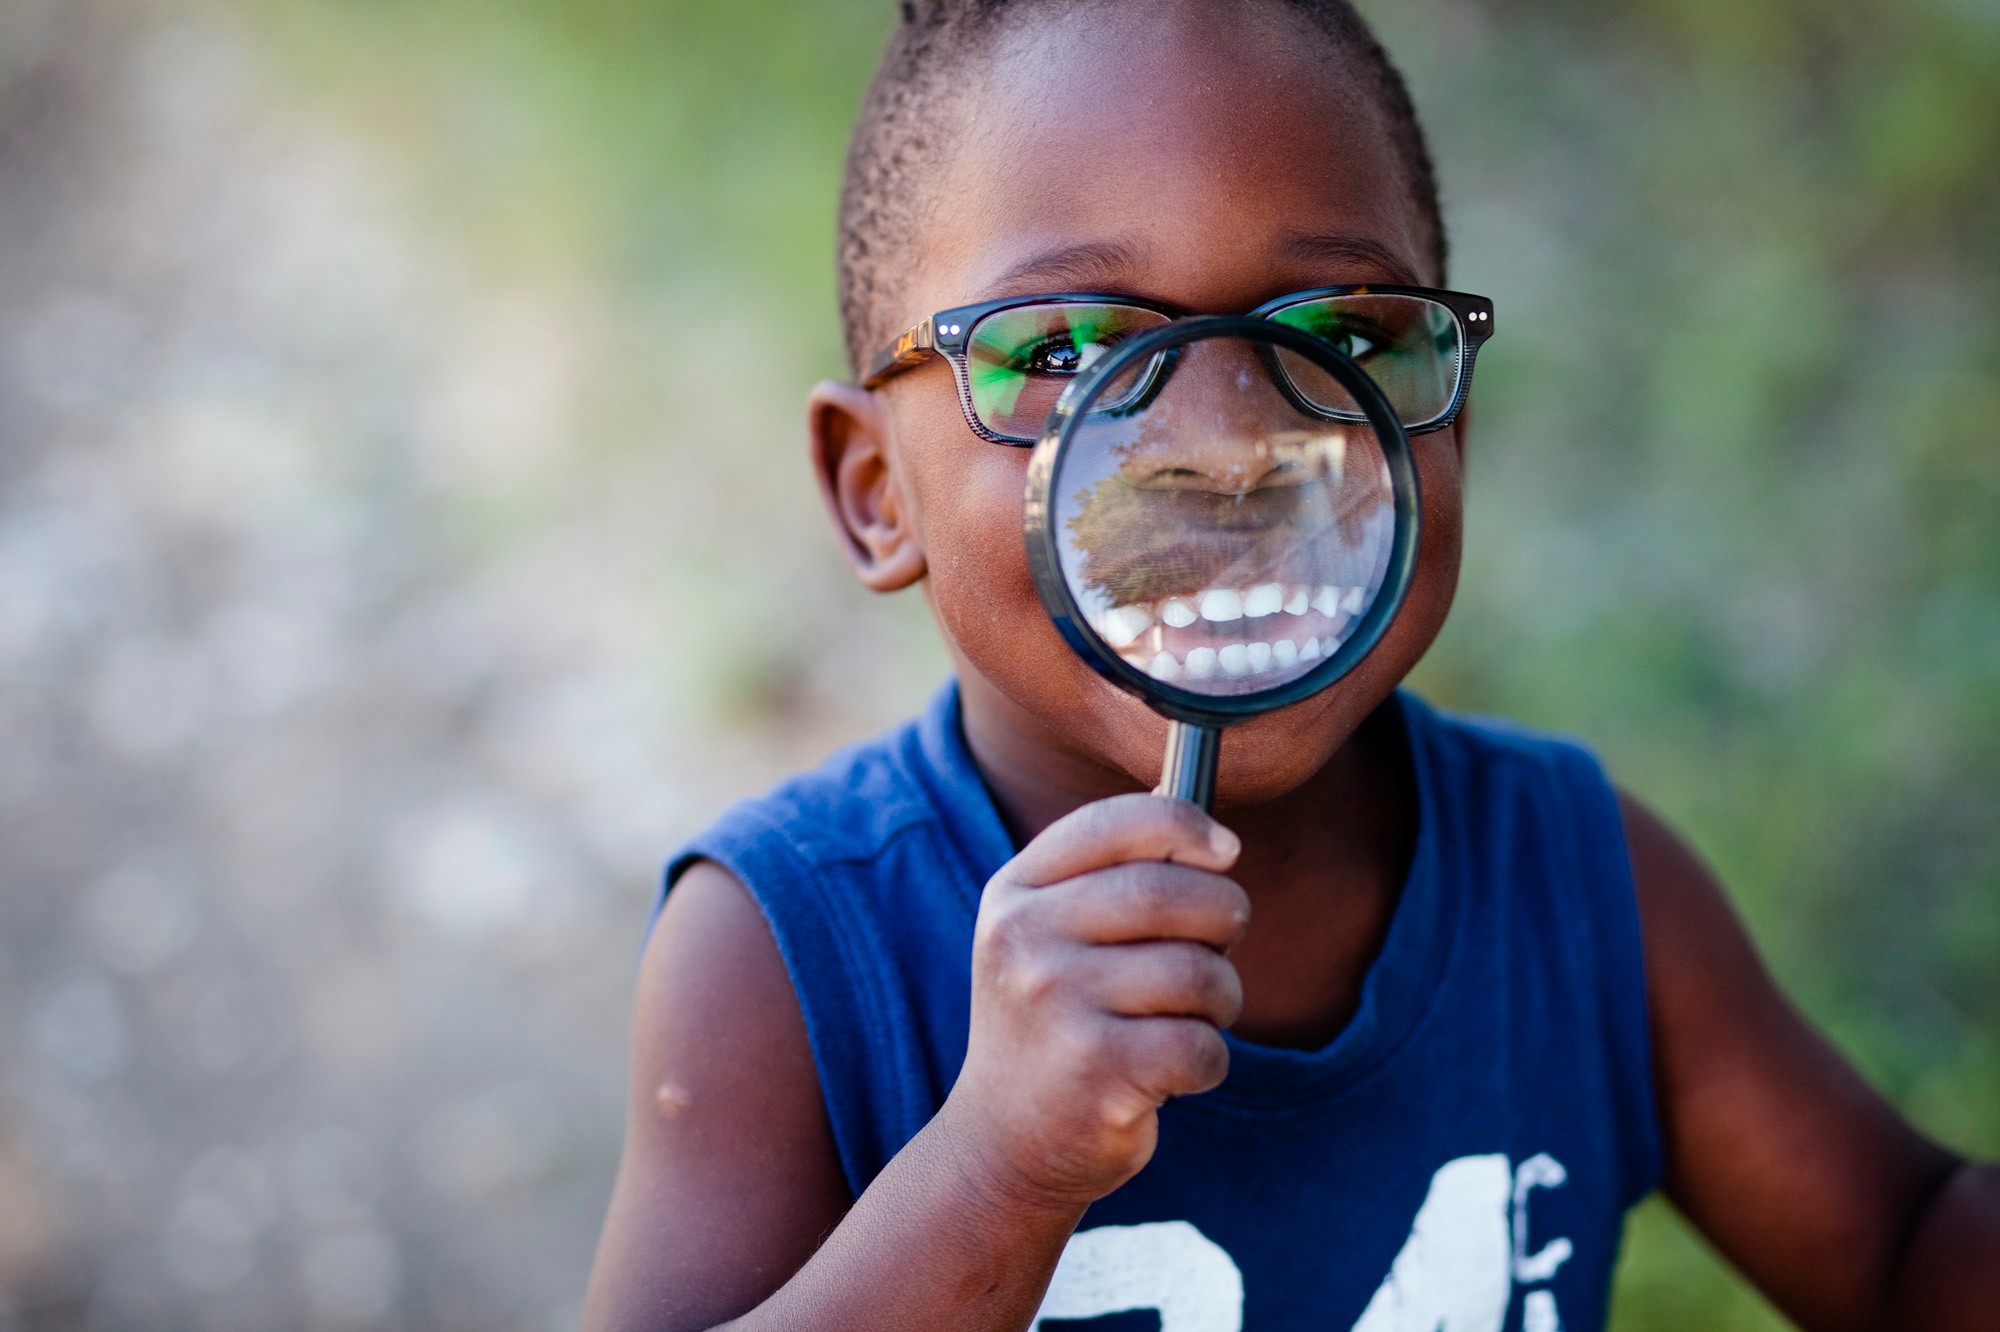
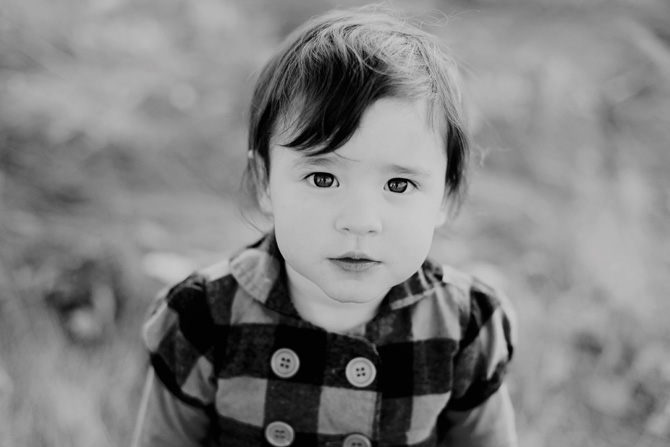
When taking photographs of people I always have my focus point on their eyes, because that is what you want to draw the attention to {with the rare exception where you want to have something else in focus}.
Not only will the point that you are focusing on be in focus but so will everything in the same focal plane, which is everything that is the same distance from the lens as the object you are focusing on.
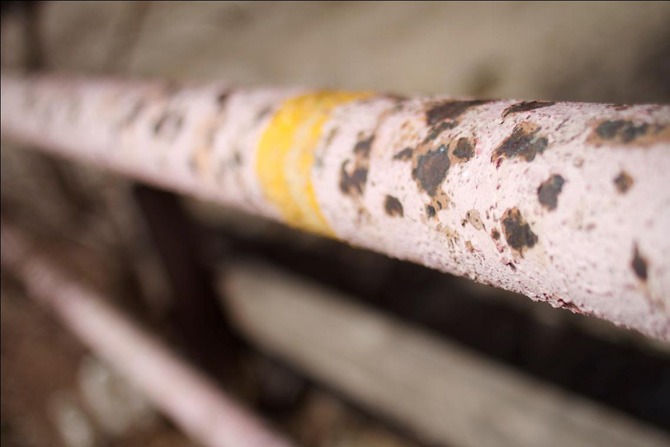
Here is an example where I focused on the eyes, and because the one ear of the dog is on the same distance from the camera as his eyes (therefore, on the same focal plane) it is in focus too. As opposed to the background and even the other ear of the dog which are blurry because they were not on the same focal plane.
In this photo I focused on the right side of the bar which is why that part is in focus and the rest is blurry:
In the photo below since her eye’s are not on the same plane I focused on the one that is closer to the camera:
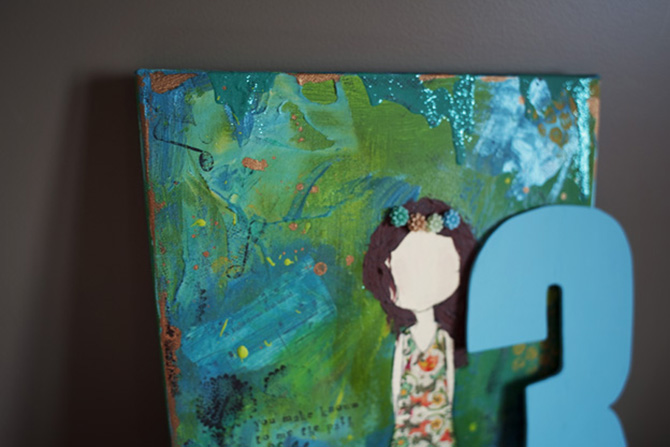
Here are the photos I was talking about in the video, on this one I had my camera set to auto and it selected where it wanted to focus, which ended up being on the left side of the canvas:
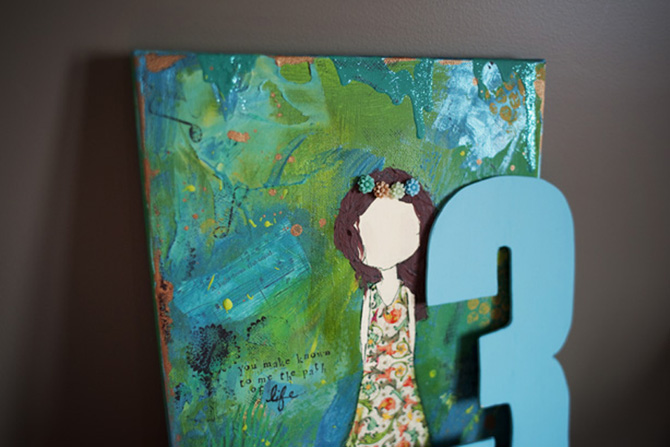
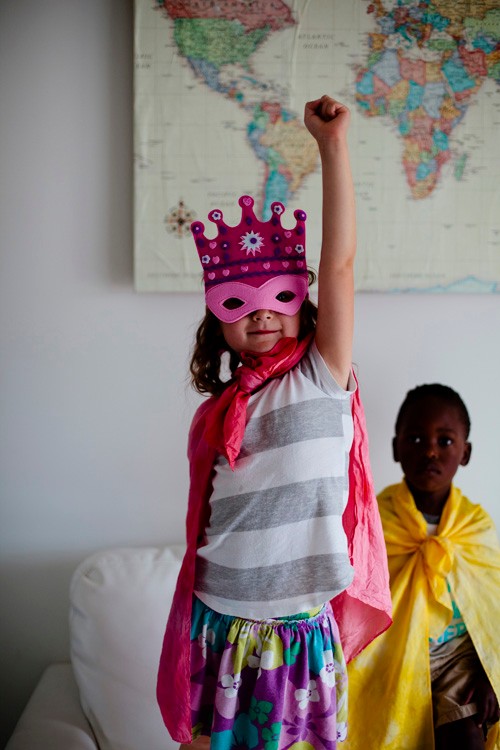
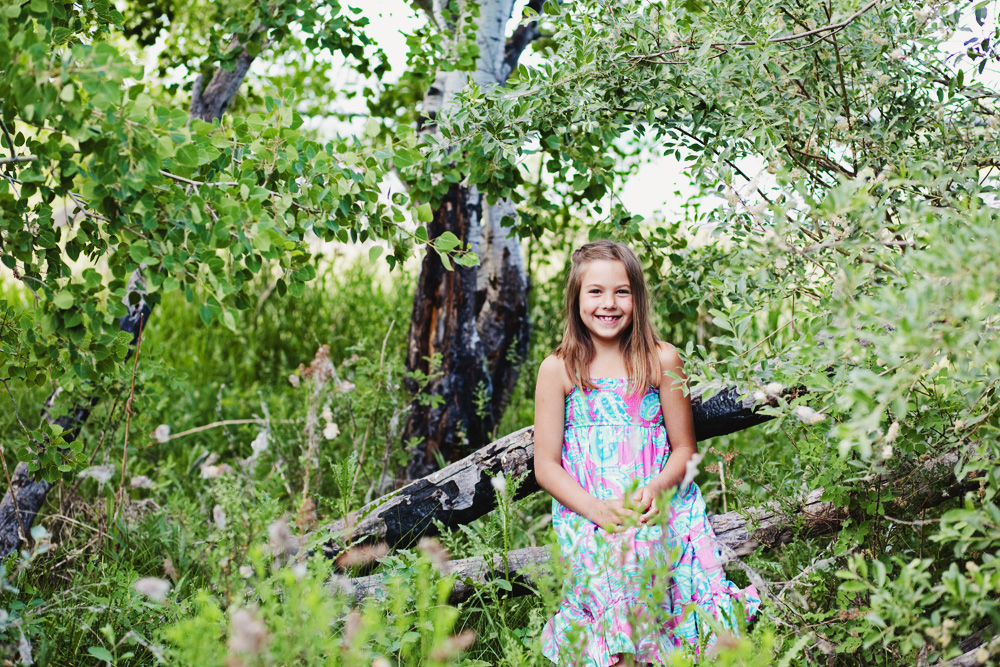
For this one I had my camera in manual mode and selected my focus point so it was on her crown, and as you can see, that part is in focus:
QUICK TIP
- Most lenses have a little switch on them where you can turn it to manual focus. When it is on manual focus you will need to focus your lens yourself, I rarely do this, 99% of the time I keep my lens on automatic focus.
- Sometimes your lens will have trouble focusing and won’t allow you to take a photo. This usually happens when you are trying to focus on something too dark or too bright. If this happens try focusing on something else.
- Another reason your lens might be struggling to focus is because you are trying to focus on something too close to your lens, if this is the case, move away from the object and try taking the photo again.
THE THREE SETTINGS
This is where you will start to see big changes in the way your image looks.
The three main settings that we are going to talk about are:
- ISO
- aperture
- shutter speed
Each of these settings control how much light your camera and lens let in and ultimately how dark or bright your photo is.
There is no magic combination that always works. You will probably change your ISO, aperture and shutter speed every time you get your camera out of the bag. This workshop should help you understand what the settings mean and how they can help you get a great image.
At times people will share their settings for a photo written like this:
f/2.5 ISO 400 1/500
What does that mean? Well, f/2.5 is the aperture, ISO 400 is the ISO and 1/500 is the shutter speed –this will all become clear through the next few sections.
This photo was taken at: f/2.5 ISO 320 1/400
ISO
This photo had an ISO of 400
Think back with me to the days when you were shooting film. Remember how you had to buy 100, 400, 800, 1600 film? That was the ISO.
ISO indicates your camera’s sensitivity to light so the higher the ISO the less light needed. For example, if you are shooting outside on a nice, bright day, you will usually only need to have your ISO set for 100 because you don’t need to allow more light in. On the flip side, if you are photographing indoors or at night you will have to raise your ISO. The lowest ISO for most cameras is 100 and the highest ISO will vary from camera to camera.
ISO is usually the easiest setting to set on most cameras as there is often a button labelled ISO. But if you can’t find it you can always look in your manual, for most Canon cameras it is under Image Settings in the table of contents.
TAKE A MINUTE
Once you have figured out how to adjust your ISO take a minute to set it to ISO 100 and take a photo then change it to ISO 1600 or even ISO 3200. Take a look at the difference. Your image will probably not be perfect yet because we still need to work in aperture and shutter speed but it is the first step.
This photo had an ISO of 200:
QUICK TIP
While a high ISO (like 1600) can be beneficial you do not want to shoot with a high ISO all the time as it can cause your photos to look noisy or grainy.
This photo had an ISO of 125, so graininess isn’t an issue.
f/1.6 ISO 125 1/6400
This photo was taken early in the morning and had an ISO of 1600 so it is much more grainy.
f/2.2 ISO 1600 1/160
Aperture
Aperture is a little trickier than ISO but once you understand it you will realize how dramatically it can change your photos.
Aperture is expressed as an f-stop (written as F3.5 or f/3.5) and does two major things:
- controls how much light reaches your lenses sensor {so how bright your photo will be}
- controls your depth of field {more on that in a bit}
While your ISO range was dependent on your camera your aperture depends on your lens. Most lenses that come with your camera as a kit can only go down to f/3.5 or f/4.5 while some of the more expensive lenses can go down to f/1.8, f/1.4 or even f/1.2.
The lower your f-stop {f/3.5 is lower than f/11} the more light will be let into your lens and therefore the brighter your photo will be. A low f-stop can also be expressed as wide aperture. Imagine this with me, think about a piece of paper with a circle cut out of it, the wider circle is the more light will be let through it, the smaller it is, the less light that will be let through it, that is what is happening with your lens. So think: wide circle {aperture} = more light, small circle {aperture} = less light.
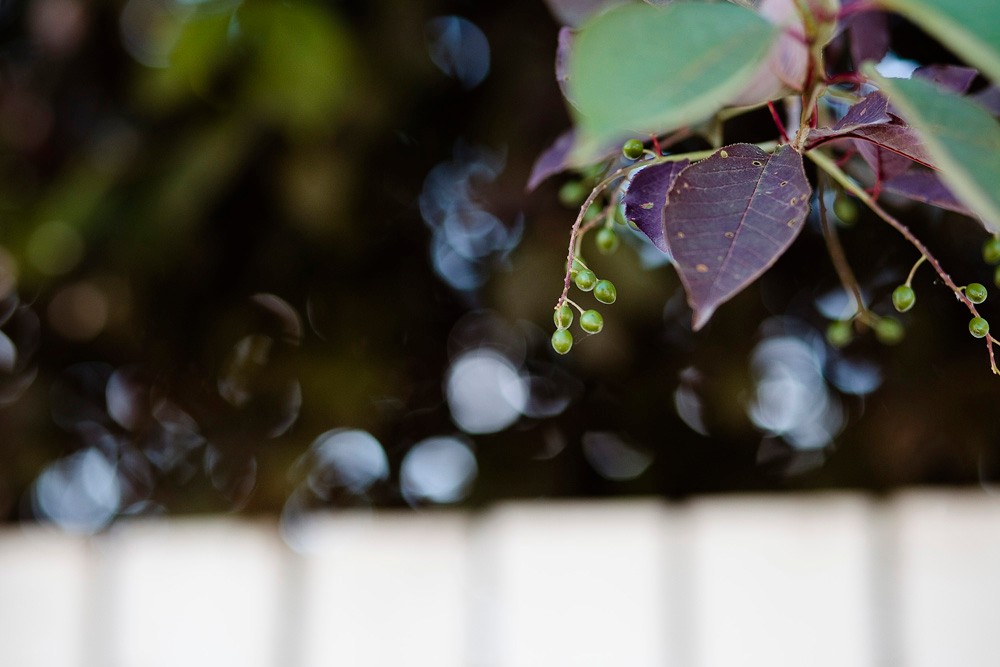
This photo had an aperture of f/2.8, since I focused on the berries the rest of the photo is blurry:
TAKE A MINUTE
Take a look at your camera manual to figure out how to adjust the aperture on your camera, then try taking a photo at the widest aperture you can {ex. f/1.8 or f/3.5}. Then try taking a photo at f/5, then f/11, can you see a difference? What if you take a photo at f/22?
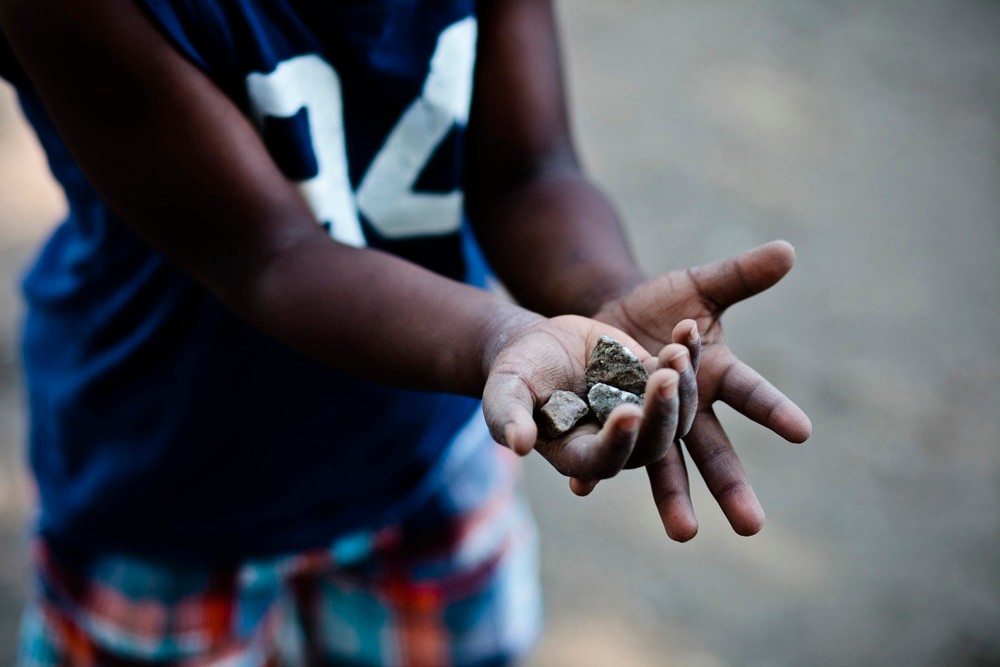
The photo below was taken at f/2.5 so the rocks are in focus but even his finger tips are out of focus:
QUICK TIP
Some lenses have what is called variable aperture, this means that the widest aperture is different if you are zoomed in or zoomed out {variable aperture is usually written as f/3.5-5.6}. If your lens is one of these try zooming in, what is the widest aperture you can have? What if you zoom out?
DEPTH OF FIELD
Depth of field is also controlled by your aperture. What exactly is it? Have you seen those photos where one thing is in focus and the rest is blurry? That is called depth of field. Here is an example:
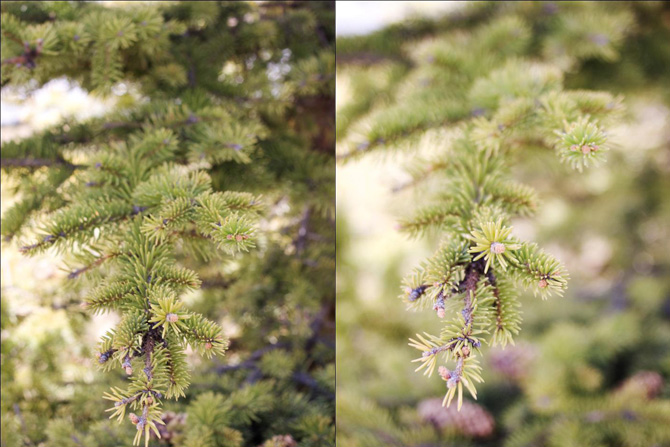
Notice how the photo on the left has a lot more in focus and the image on the right is just focused in on the tip of the branch? The one on the left was taken at f/5.0 and the one on the right was at f/2.2. Therefore, the wider your aperture the shallower your depth of field.
You can also see the difference it the photos below, for each one I focused on Noah in the middle and as my aperture increased more in front and behind him came into focus. This is with an aperture of f/1.4:

f/5:
f/11:
At this point you can’t see much difference between f/11 and f/22 because this photo doesn’t go very deep, if this was captured outside the difference would be more prominent.
f/22:
In the photo below I had my aperture set to f/2.5 so she is in focus but the background behind her has a nice blur to it.
This photo had an aperture of f/3.2 that way I could make sure to get their faces clear and still blur the background:
At this point in my workshops some people have noticed how limited they are in the lens or lenses they currently have and always ask if I have a good recommendation for a cheap lens that has a wider aperture and my recommendation is always the 50mm f/1.8. This was the first fixed lens I purchased and the Canon version only costs about $120, I’ve never used the Nikon one but have heard some good things about it and it seems to have similar pricing.
SHUTTER SPEED
I have found shutter speed to be the easiest concept for me to understand and explain because it is exactly what it says. It is the speed that your shutter closes. The general idea is the slower your shutter closes, the more light allowed in, therefore the brighter the picture and the opposite works too, the quicker your shutter closes, the less light allowed in and therefore the darker your image is.
Shutter speed is expressed in fractions of a second {eg. 1/200}, although on your camera it may just say 200.
How does this work in real life? If you are outdoors in the bright sunlight you will want a fast shutter speed because you won’t need to let in that much light. On the other hand, if you are indoors or outside while it is dark you will need a slower shutter speed.
If you are using a slow shutter speed {eg. 1/30} you will need to be careful. Since the shutter is staying open so long if you or your subject move there may be motion blur.
If you are photographing children shutter speed is something you want to pay close attention to, since they generally tend to move around a lot you want to have a quicker shutter speed to avoid motion blur, the same goes for sports photos.
The photo below was taken with a shutter speed of 1/800:
This photo had a shutter speed of 1/500:
If used correctly I think a little bit of motion blur can have a cool effect. In this photo you can see some blur in the little boy in the front, especially in his right hand. I like it though because it shows that he was running through the photo.
f/2.5 ISO 100 1/320

TAKE A MINUTE
Take some shots at different shutter speeds, try 1/2000, 1/100, 1/30. Notice the difference in light?
QUICK TIPS
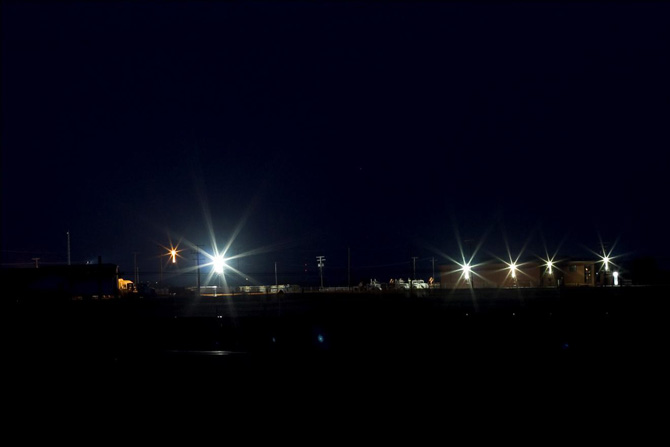
- Your shutter can also be set to stay open for a couple of seconds {indicated by: “}, this is what is used when photos are taken of tail lights at night so you can see the trail of where the cars drove.
- Another neat thing your shutter can do is go into bulb mode, this is usually indicated by a B or the word bulb {on some cameras you need to turn your camera off of manual mode and into bulb mode for this}. In this setting your shutter will stay open for as long as you hold down the shutter button {most cameras will time out after a few minutes of this}. Bulb mode is often used in photographing star trails.
The photo below was taken with a shutter speed of 5 seconds, resulting in neat star shaped lights.
f/8 ISO 250 5”
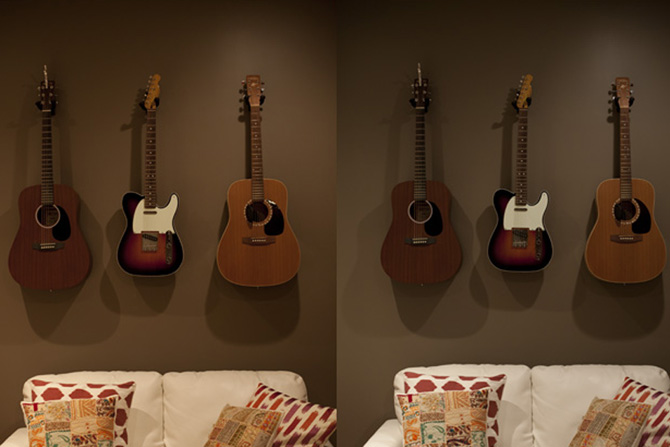
WHITE BALANCE
White balance is for making the white parts of your photograph actually appear white and adjusts how warm or cool your image is. Your camera will be set to auto white balance {AWB} as a default. It is not necessary to change your white balance but I would take some time to try out each setting.
Most cameras will have preset white balance modes for these options:
- daylight
- cloudy
- shade
- tungsten light
- fluorescent light
- flash
- custom
- color temperature or kelvin
To give an example, the photo on the left was taken in the evening with no natural light and my camera was set to auto white balance, the photo on the right was taken at the same time with all the same settings except I changed my white balance to tungsten light:
IN-CAMERA LIGHT METER
Most SLR’s have what is called an in-camera light meter. You can usually see it when you are looking through your viewfinder, it is at the bottom of the viewfinder and looks like this:
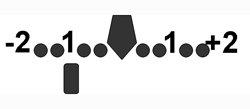
Basically your camera is trying to help you get a properly exposed photo. When the rectangle on the bottom is in the middle it is telling you that your image will be properly exposed. When it is on the negative side (as it is shown on the photo) it is telling you that your image will be underexposed (too dark) and when it is on the positive side it means that it would be over exposed (too bright).
Using your camera’s light meter does not always give you the photo that you want but it is a good way to learn proper exposure.
PUTTING IT ALL TOGETHER
Now it is time to put it all together. Because the three main settings {ISO, aperture and shutter speed} all control light they will work together to get you that perfect image.
TAKE A MINUTE: Try adjusting all three settings to get a nice, properly exposed image.
QUICK TIPS:
To get a brighter image:
- raise your ISO
- lower your aperture
- lower your shutter speed
To get a darker image:
- lower your ISO
- raise your aperture
- raise your shutter speed
In case you have troubles remembering I’ve made this into a printable cheat sheet for you. Just print it out on some card stock, cut it out, slip it into your camera bag, and it will be ready when you need it.
f/3.5 ISO 400 1/250 sec
f/3.5 ISO 200 1/250 sec
f/2.8 ISO 200 1/320 sec
f/2.5 ISO 200 1/500 sec
Congratulations! You now have all the knowledge needed for shooting in manual mode! It is something that will require practice but I promise, the more you work with changing your settings, the quicker it will all come together and just become second nature.
Have fun!